There are times when I run into an idea that requires use of inexpensive computer system. I used to go with Viatech nanosystems but they are expensive, i.e. in relation to the project budget. After some time I came across various systems like the parallax basic stamp, arduino, Raspberry Pi and Waspmote. I am currently using Arduino on a project (I will divulge this when it is done). My project with Raspberry Pi is in the back burner after I brick the unit (ouch!) when I used it to control an optorelay matrix system. The Waspmote project was a more serious project which will be pursued sometime next month. My current preference for small project is the Arduino due to the vast references available in the web. The language used is C++ which is my second programming language. Using the Raspberry Pi is for the more high-end project. Thanks for Raspbian(linux variant), I am able to utilize my expertise in Pascal, my choice for application programming. The Waspmote is similar to Arduino but a little more sophisticated in terms of wireless and sensor control. It uses C++ as development language.
Overall, my SBC preference is interchangeable and project dependent.
Friday, October 4, 2013
Wednesday, August 21, 2013
Control your household lamps and your garage doors via the internet
There are times we forget to turn off the lights when we leave the house, or worse, we left the garage door open! Sure we can automate the lights on/off but that leaves control over a timing device without the satisfaction of a personal control. Knowing myself (a control-geek), I wanted that control and the challenge of building the system. I found this: http://connect.iobridge.com/tutorials/open-and-close-your-garage-door-over-the-internet/.
I ordered the items, hacked a few items (the garage door remote) and did a little soldering. Previously, I installed a garage-door monitoring sensor that would turn-on a lamp (by the TV) when the door is left open. The sensor triggers a code and sends it to the receiver which turns the lamp on or off. This signal can also be used to automatically send email to a recipient verifying the status of the garage door.
The camera was located in the garage but have moved it (see view on the right) facing directly to house where a full-view of the house can be seen. Camera location: the mailbox. So comes the idea to build a mailbox housing the wifi camera. Since the mailbox is about 25 yards from the house, running an electrical wire would be too expensive or too dangerous. So a 15-watt solar panel provides the charge to the 12 volt battery used to power the camera. The camera idea came to reality. See photos below.
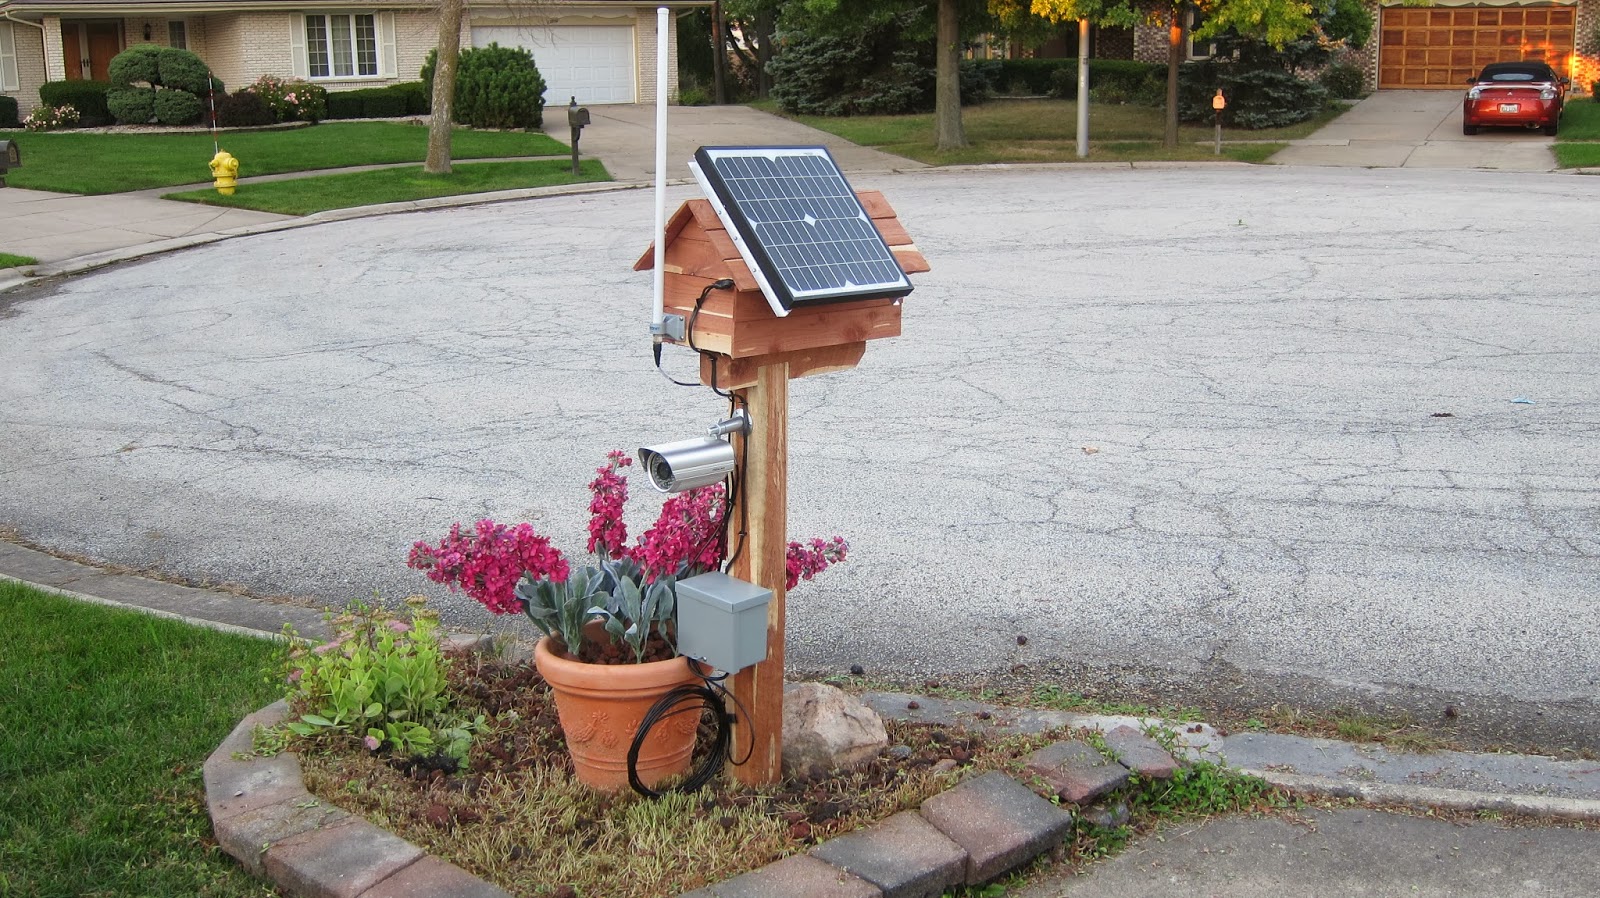
Camera located at the post of the mailbox.

View showing proximity of the mailbox to the house.
It is about 25 meters.
The battery is hidden in the flower pot.
(see image generated on the right).
Using Transcend WIFI SD Card
Recently acquired the card and as always I was excited to take it out of the package as soon as it got into my hands. The WiFi SD card is the the better answer to EYE-FI's limited memory capacity. The 32-gig is plenty for my Canon S95 which I tag along in my pocket everyday. Browsing the internet, I found that the Transcend card is running a variant linux OS with scripts written in PERL and Javascript (see links below). This is most intriguing. The Card is hackable. Being a consultant in Medical/Industrial Informatics the card could be utilized as a data server and be used for gathering data wirelessly from input devices and transferred to software applications for whatever use there may be. The WiFi card has a built in web-server and could be accessed on any PC besides the published apps for Android/IOS devices. To Connect via your PC you will need to connect your PC:
1. Turn on your WIFI-SD card equipped camera. Temporarily disable automatic shutoff of the camera.
2. (Peer-to-peer or Direct Share) With your PC connect (via wifi) to http://192.168.11.254. This is a connection directly to the wifi server of the camera. If you configure your sd-card using the internet mode (see manual below) connect to your wifi access point/router. On your phone app determine the IP Address of the camera under SETTINGS. This should be within address supplied by your router and starts with 192.168.etc.etc. Use this address in your browser.
3. The default username/password is lowercase "admin". You should now see the browser interface along with the self explanatory menu system. You should now be able to browse/download your photo/video from your camera wirelessly.
Note that when the setting is in INTERNET MODE you can upload or share the picture by using your facebook, twitter, picasa, flickr, etc. Select the appropriate upload app.
That is all there is to it.
http://haxit.blogspot.ch/2013/08/hacking-transcend-wifi-sd-cards.html
For camera applications of the Transcend WIFI-SD see:
http://www.transcend-info.com/files/Manual/WiFiSD_Manual_v1.4_EN.pdf
1. Turn on your WIFI-SD card equipped camera. Temporarily disable automatic shutoff of the camera.
2. (Peer-to-peer or Direct Share) With your PC connect (via wifi) to http://192.168.11.254. This is a connection directly to the wifi server of the camera. If you configure your sd-card using the internet mode (see manual below) connect to your wifi access point/router. On your phone app determine the IP Address of the camera under SETTINGS. This should be within address supplied by your router and starts with 192.168.etc.etc. Use this address in your browser.
3. The default username/password is lowercase "admin". You should now see the browser interface along with the self explanatory menu system. You should now be able to browse/download your photo/video from your camera wirelessly.
Note that when the setting is in INTERNET MODE you can upload or share the picture by using your facebook, twitter, picasa, flickr, etc. Select the appropriate upload app.
That is all there is to it.
Hacking the Transcend WIFI-SD
http://hackaday.com/2013/08/12/hacking-transcend-wifi-sd-cards/http://haxit.blogspot.ch/2013/08/hacking-transcend-wifi-sd-cards.html
For camera applications of the Transcend WIFI-SD see:
http://www.transcend-info.com/files/Manual/WiFiSD_Manual_v1.4_EN.pdf
Monday, April 22, 2013
Automating your EMR
There are times when your SOAP note has statement that requires input from the user. Study those statements that could be responded to by a standard response, e.g. "YES", "NO", "NEGATIVE", "No significant issues." etc. Instead of typing in the responses, the user can program function keys on the keyboard to automatically post the response into your SOAP note.
The application that can do this is AUTOHOTKEY (www.autohotkey.com). It works for windows only. There may be some out there that work on Mac and Linux. Download the app and read through the tutorial.
The application that can do this is AUTOHOTKEY (www.autohotkey.com). It works for windows only. There may be some out there that work on Mac and Linux. Download the app and read through the tutorial.
Thursday, April 18, 2013
What is the best Tablet PC for EMR use?
I have roamed the internet and computer stores to find the most ideal laptop/table/ultrabook for EMR (electronic medical records) applications. Wares that do not have stylus capability were not even evaluated. I was looking for one that could accept handwriting with a fairly good handwriting input interface. Using stylus with stubs as pen is out of the question. I prefer the pen-like size of stylus. The three I considered for evaluation are the Lenovo X230Tablet, Microsoft Surface Pro and Sony Vaio Duo 11.
All of them have good pen-input response. Having loaded the Medical Dictionary helped in the recognition of medical terminologies. Lenovo lends itself for use without being carried around. It is slightly heavy to be cradled. The Surface Pro has some heaviness to it also. With the keyboard the ergonomics of converting to tablet is not as effortless as the Sony Vaio 11. I gave the Sony two thumbs up.
For a comprehensive review see: http://www.notebookcheck.net/Review-Sony-Vaio-Duo-11-SV-D1121X9EB-Ultrabook.84581.0.html
Tuesday, April 16, 2013
Automate your picture uploads to the web
It is very easy uploading pictures if you do not have a lot to upload, but when you have a lot of them then uploading becomes very tedious. I also want them in my PC as my back up and not endanger their existence when uploaded into the cloud. You can also do this using your mobile phone pictures with the appropriate app, e.g. Factamobile Picture Upload app for Android. I am sure there is an FTP* picture upload for IOS. Here is my solution:
My camera, a Canon EOS 7D is equipped with WFT5 wifi attachment. You may also use the EYE-FI SD card to transmit your photos via a hotspot. The first thing to do is to install an FTP server on your PC. I use FileZilla server. It is freeware and easy to configure. It comes with great tutorials and support from other users. During the configuration you will be asked to name a default folder to receive the pictures sent by the camera. Once you set-up this folder, configure it to sync with either Picasa or Sugarsync. That takes care of automatically uploading to the web. To receive the photos from anywhere you must open up your internet router to port forward to your PC. To port forward to your FTP server, here are the steps you need:
*Note: FTP - File Transfer Protocol; LAN - Local Area Network; WAN - Wide Area Network
My camera, a Canon EOS 7D is equipped with WFT5 wifi attachment. You may also use the EYE-FI SD card to transmit your photos via a hotspot. The first thing to do is to install an FTP server on your PC. I use FileZilla server. It is freeware and easy to configure. It comes with great tutorials and support from other users. During the configuration you will be asked to name a default folder to receive the pictures sent by the camera. Once you set-up this folder, configure it to sync with either Picasa or Sugarsync. That takes care of automatically uploading to the web. To receive the photos from anywhere you must open up your internet router to port forward to your PC. To port forward to your FTP server, here are the steps you need:
- Determine the IP address of your PC where the FTP server is located. It usually starts with 192.168.....
- Open up your modem/router. Consult with your router manual for the IP address.
- Log on to your router from your favorite browser and look for "Port Forwarding" or "pinholes" option.
- Forward port 21 (usually the FTP port, change if otherwise) with the IP address of your pc.
- Determine your WAN* IP or Internet IP address. If you do not know this, google using your PC and search for "what is my IP". This should show your internet IP.
- In your camera setting, select FTP server option. Enter your credentials and the FTP address as InternetIP:21 (replace InternetIP with the IP you obatined).
*Note: FTP - File Transfer Protocol; LAN - Local Area Network; WAN - Wide Area Network
Sunday, March 24, 2013
Setting up your webcam stream on your blog
My daughter, Marji adopted a dog she named Maggie. Being concerned about her she needs to monitor Maggie when she is out working. To help Marji from worrying I installed an IP Camera (webcam) so that she can monitor Maggie at anytime. She also wanted her friends to view the video stream via her blog.
To anyone who desires to have their video stream on their blog, here are the steps:
1. Go to your blog site (you must be the administrator)
2. On the upper right corner, click on DESIGN
3. On the left hand, select LAYOUT.
4. You will see your layout. Click on ADD A GADGET.
5. A pop-up will appear, select HTML/JAVASCRIPT
6. Add the title of your gadget, e.g. "My Bathroom" (just kidding!)
7. On the body, enter the following Javascript -
_________________________________________________
<script type="text/javascript">
var videoFrameCount = 2;
var refreshRate = 250;
function load_video()
{
setTimeout("reload_image()",refreshRate);
}
function reload_image()
{
var xx = new Image();
xx.src = "http://YOUR_URL:YOUR_PORT/snapshot.cgi?user=YOUR_NAME&pwd=YOUR_PASSWORD&next_url="+videoFrameCount;
document.getElementById("imgDisplay").src = xx.src;
videoFrameCount++;
}
function video_error()
{
setTimeout("reload_image()",refreshRate);
}
function video_error_clear()
{
setTimeout("reload_image()",refreshRate);
}
</script>
<p> <img onerror="video_error()" id="imgDisplay" onload="load_video()" name="imgDisplay" src="http://YOUR_URL:YOUR_PORT/snapshot.cgi?user=YOUR_NAME&pwd=YOUR_PASSWORD&next_url=1" width="300" height="220" /> </p>
________________________________________________
8. Replace these items with your data:
YOUR_URL:YOUR_PORT with your own URL.
YOUR_NAME - the camera's admin username
YOUR_PASSWORD - your password.
9. Save your gadget.
10. On the layout mode, drag your new gadget where you want
to place the camera view.
11. Save your arrangement.
12. Preview, if not satisfied go back to step 10. That is it!
This project presumes that you know how to set up your webcam, url, port forwarding, etc.
Good luck!
Subscribe to:
Posts (Atom)